always start off with simple shapes, trying to tackle complex shapes from the start will skew proportions
– to start guideline sketches, i usually make a box for the palm, then drawing the thumb as reference, and then adding the rest of the fingers
FINGER NAILS ARE YOUR FRIEND, DONT BE AFRAID TO DRAW THEM!!! THEY ADD PERSPECTIVE, CHARACTER, AND DEPTH TO YOUR HANDS!!! I LOVE DRAWING FINGER NAILS
GO HAM!!!!!!!!!!!
IF YOU REALLY WANT TO GET GOOD AT DRAWING HANDS JUST WATCH MOB PSYCHO 100 HONESTLY LMAO…. even if the hands arent proportional to real life, the movement and gesture can REALLY REALLY HELP
AND DRAWING FROM REFERENCE AND OBSERVATION IS YOUR BEST ADVICE
Okay first of all, sorry to take so long to answer. I really wanted to draw some pics for this, and the last weeks have been quite busy.
1. Draw from the reference
Drawing is like learning a new language: You can’t say you wanna learn English and then just start making up your own words because you think that finding words in the dictionary is cheating – It doesn’t make sense. Find a super cool robot picture and try to copy it. These are called “studies” for a good reason. You’re studying the vocabulary of those drawings. Many times people don’t share their studies since it’s only for the practice. But don’t study just one person. You don’t want to become that person – you want to become better! And if you post your study online, don’t forget to credit the original artist!
2. Try different techniques
One of my favorite techniques is something I call color blocking – I’m not sure if it’s an actual term or just something I came up with. I kind of carve the silhouette of the robot with one color and then I add a second color and carve the details in. I do this also if I have a picture with lots of characters and I want to make sure everything reads correctly. But these are all personal matters. Try different techniques until you find a one that works for you. And remember to flip your canvas!!
3. Try different brushes
My favorite brushes vary, but these three are the ones I keep using more than the others. Kyle’s brush I got used to while I was working on my freelance work – it just feels good to draw with.
The square one is really fun to work with in mecha designs, and the basic one also feels surprisingly good while drawing. Sometimes I just grab a new brush, start doodling, and end up with a decent piece.
4. Symmetry vs. asymmetry
This one I included especially because I’m talking about robots. Breaking up the machines with asymmetrical parts gives them more character BUT it’s important to keep the symmetry in mind. If I do a robot that has a one big arm and one small arm, I later make sure that most of the other parts are symmetrical. This way the asymmetry is the choice rather than a mistake.
5. Draw from the reference (!!!)
Yes, I added this the second time because I really feel it’s important! I use Pinterest all the time – I have a board with over 1000 pins of robots! There are paintings from my favorite robot artists, 3D models of super cool robot designs, and even photos of real robots all collected in one place. And for anyone who feels “wrong” doing this: Finding reference DOESN’T mean copying – it can be just an idea or inspiration: It’s finding the language you want to use. Sure you won’t need the reference as much later on as you build your own “shape-vocabulary” – just like you won’t need your dictionary after you have learned the words you use.
6. It doesn’t have to be perfect
I’m never 100% happy with my work. But I have learned to say “oh well” and move on. Next time I’ll do better.
7. BE PROUD!
Don’t talk down your own work no matter how much you’d like to. If you’re not standing behind your drawings, who will? Sure you do see the mistakes, but it’s still a great piece of art you made!
A few people have asked about this recently so I tried to break down my method of painting faces to the best of my ability. I personally like to use gritty chalky brushes, and this particular painting was mainly done with this brush by Mark Winters.
Process tutorial with a lot of art theory tips mixed in! Definitely a valuable resource!
omg dont be ashamed at all!! Hands are generally tough to get used to, lots of artists struggle with it! so dont be ashamed i feel you.
and I actually have made a hand anatomy guide before in fact! If you want to get better at drawing hands I def recommend you learn the basic anatomy first. Please check out the ones I made, I try to make it simple and easy to understand:
There’s my guide to the anatomy, but here’s some more tips that I’ve noted to myself that I’d like to include
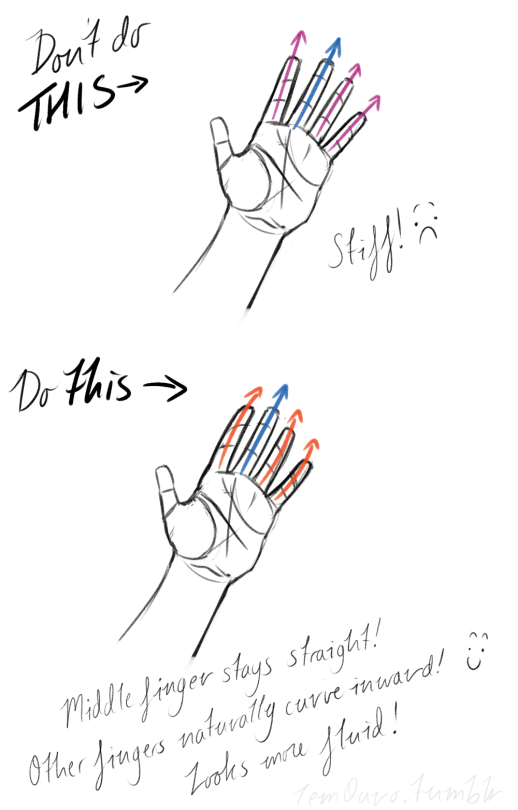
First off, I’d like to just note on the fingers: if you pay close attention to your own hand, you may notice the fingers are ever ever so slightly curved inward. It’s a very subtle detail, but I noticed that, despite how slight it is, it can make a hand look more lively, and less stiff.
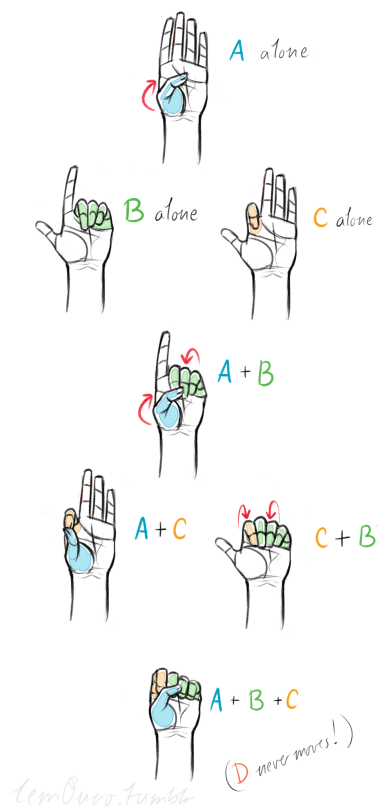
Second, the “M” on the palm! Your hand moves in many ways, and because it does it creates creases in your hand. The most prominent creases appear to make an M shape; this is handy to remember for what I’m going to talk about next. (It also could be a “W” I guess, or to be more specific a “ )X( “; just think of it in whatever way helps you remember!)
SO now that you see the M, draw your hand as a basic blocked shape and add your details. As you do, you can see that the M divides the palm into four basic parts!
When the hand moves, parts A, B, or C of the palm, alone or in different combos, will create the general poses that the hands do normally. These parts are the parts that move, with D being stationary, no matter what!
Here’s a chart of all the possible combos. Once you have down what part of the hand moves for a certain pose, you can change up the fingers and tweak it a bit to do what you need to make it more specific!
This is simply my method of drawing hands. God knows there are hundreds of tutorials out there by other artists, but personally, this way helps me the best (after learning the anatomy first).
This way I can divide the hand and combine the parts in any such way I need!
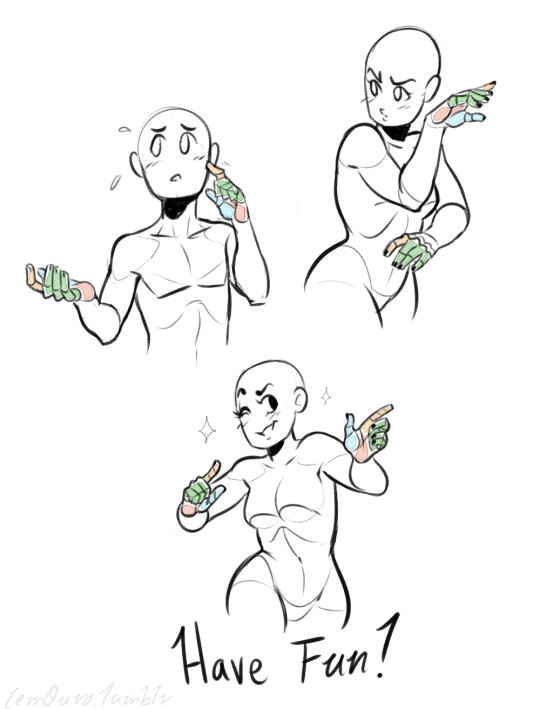
Hands take a lot of effort to grapple, and you need to practice them a lot, especially foreshortening of the hand; that’s really something you need to learn through your own studies. Look at your own hands, draw hands from life, from magazines, shows, comics; just draw hands! You’ll eventually figure out a method that works best for you. So to get better at drawing hands; draw hands!! And don’t stress over it, have fun with it!
UHH tbh the way I color hair is very inconsistent.. I change it a lot but I kinda explained it here and also here’s a short step by step, hope that helps!
This is my first real attempt at doing a walkthrough for one of my landscapes, I’d really appreciate some feedback!
it is pretty much my workflow process, there’s always something slightly big to change during render I should have solved earlier!
Anyway everyone, feel free to message me if you have any questions and I hope this helps anyone!!
Concepts are important to keep in mind, and is mostly what I try to post, but sometimes seeing all the parts come together in one workflow is quite helpful!
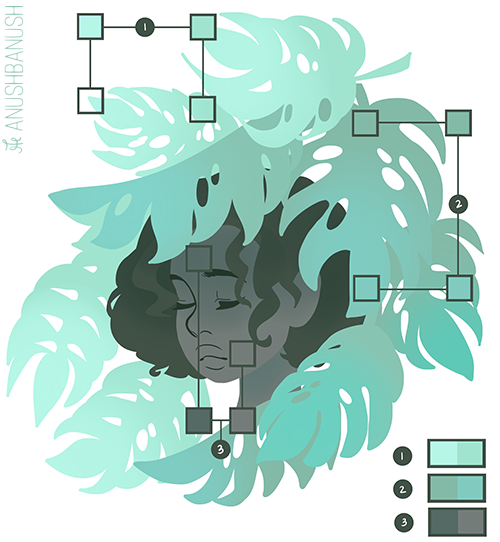
2. Add a lighter color or a darker color to the original color in order to add more value to the flat colors.
If you look at the image below it shows the comparisons of the new color that was added to the original color in order to see the difference between the two.
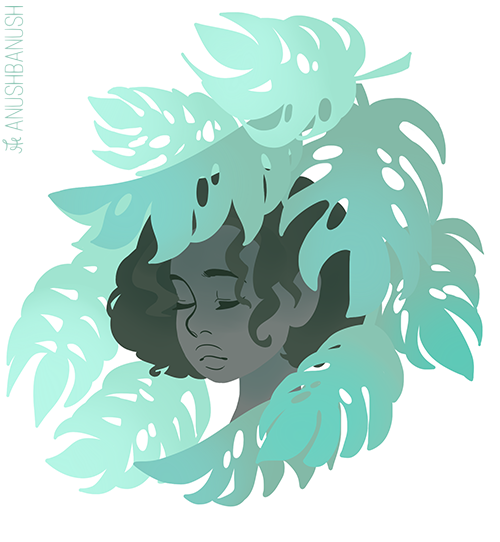
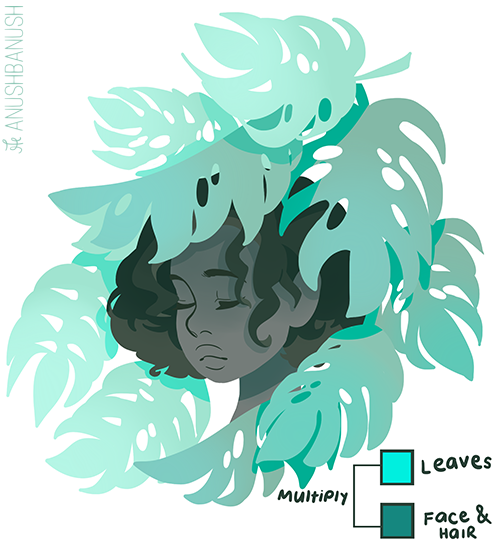
3. Add the shadows in order to show which object is above another object. To create the shadows I used the colors shown below and set them to ‘multiply’. This adds more depth to your work.
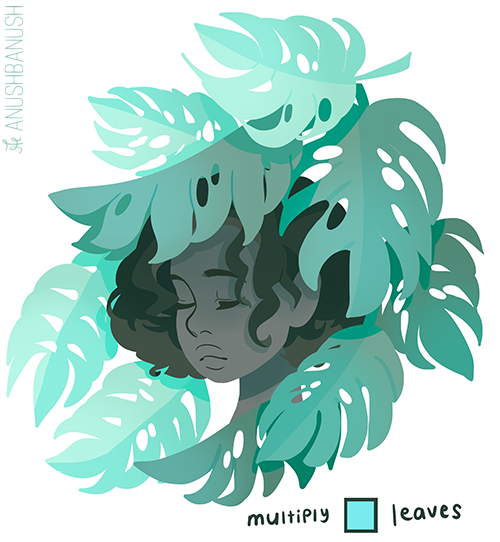
4. Use ‘multiply’ to give more emphasis on certain aspects on your work. Like for example the leaves.
5. Add the finishing touches and you are done!
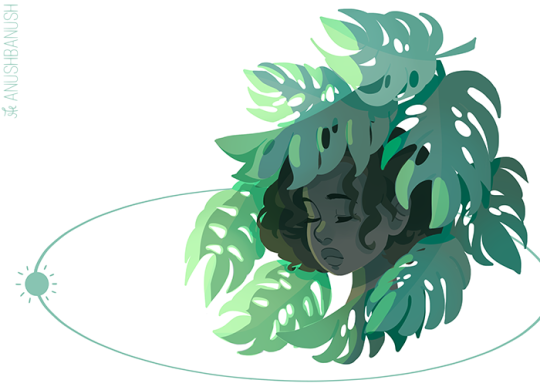
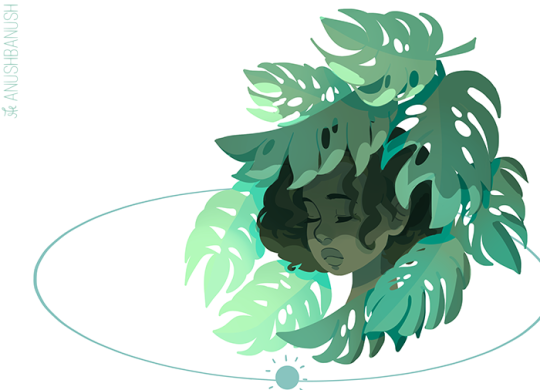
Shading (with a specific light source)
All you gotta do is determine where the light source is. In the image below, the light source is the sun. The little sun will guide you on which parts should be illuminated or shaded.
Here are some examples:
In order to see the difference that shading can do, here is a process gif!!!
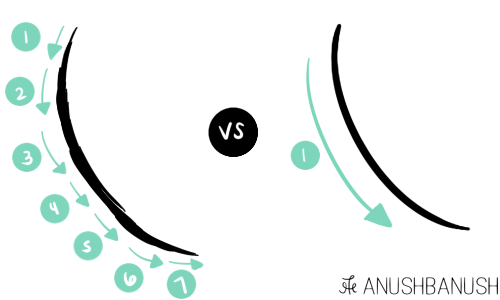
As for lines, I believe that everyone’s style is different. Some choose to do little strokes while others do just one big stroke. As for me, I just do one big stroke in order to maintain the fluidity and consistency of the line. Here is a picture of comparison:
If you want smooth lines then just try and draw it in one swift movement. If you don’t get it right, don’t erase the part that went wrong (because it will be obvious that it’s no longer one line but 2 lines because the continuity of the original line and the new line won’t be the same). You have to redo the whole line from the beginning.
If you practice this a lot you will notice that your lines will be better and at the same time, you will work faster because you don’t have to do so many strokes. Btw when you draw the line do it fast, like really fast, so that you won’t encounter any mistakes.
Just draw a lot and you will get the hang of it and I also hope you know that each artist has their own style. So maybe the one swift stroke works for me but the many short strokes work for you. Just draw in a way that’s more comfortable to you. Anyway, hope this was helpful and have a good day!