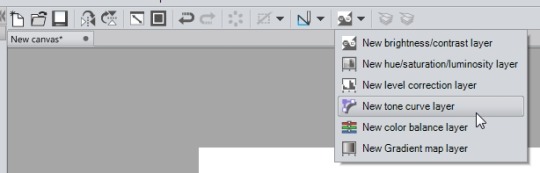
I got an ask about FA layers and so here are samples for each of them arranged in order of lineup on the drop-down menu!
tbh I only ever use the first four b/c the rest are pretty capricious?? Difference is a Wild Card that is Evil and unpredictable BUT the only thing you really need to know about it is that you can make negatives with it hoho
i started writing original fiction because of a comment i got on a house md fic i wrote when i was 12 years old. someone said “this is out of character, house and wilson would never act like this.” so i thought, “if i make my own characters, no one can ever tell me they’re out of character, because i decide,” and i started planning my first novel. now i’m 23 and i’ve written 4 novel-length works, i have a degree in publishing and i work at a literary magazine, largely because someone insulted my house fanfiction. follow your dreams.
OH MY GOD whyyyy did no one tell me you’re supposed to send thank-yous after interviews?? Why would I do that???
“Thank you for this incredibly stressful 30 minutes that I have had to re-structure my entire day around and which will give me anxiety poos for the next 24 hours.”
I HATE ETIQUETTE IT’S THE MOST IMPOSSIBLE THING FOR ME TO LEARN WITHOUT SOMEONE DIRECTLY TELLING ME THIS SHIT
NO ONE TOLD YOU???? WTF! I HAVE FAILED YOU.
Also:
Dear ______:
Thank you so much for the opportunity to sit down with you (&________) to discuss the [insert job position]. I am grateful to be considered for the position. I think I will be a great fit at [company name], especially given my experience in __________. [insert possible reference to something you talked about, something that excited you.] I look forward to hearing from you [and if you are feeling super confident: and working together in the future].
My brother got a really great paid internship one summer. The guy who hired him said the deciding factor was the professional thank you letter my brother sent after the interview.
should it be an email? or like a physical letter?
email, you want to send it within a few hours at max after the interview if you can so it’s fresh in their mind who you are.
Confirmed! I interviewed for a job right after arriving in NY. The interview went incredibly well, and I went home and immediately wrote a thank you letter and put it in the mail. I had a super good feeling about this interview.
I didn’t get the job.
However, a few weeks later, I was called in to interview with another editor in the same company, and I did get that job. I found out later from the initial editor (the one who didn’t hire me) that he had planned to offer me the job, but since I didn’t follow up with a thank you letter, he assumed I didn’t really want it. He offered the job to another contender–but when he got my letter in the mail shortly after the offer had already been made, he went to HR and gave me a glowing recommendation. It was based on that recommendation that I got called in for the second interview.
So: send an email thank you immediately (same day!) after the interview. If you’re feeling extra, go ahead and send a written one too. OR go immediately to a coffee shop, write the letter, and return to the office and give it to the secretary.
Either way, those letters are important.
Pro tip: If you really want HR to develop a personal interest in your application, publicly thank them on linkedin. Just make a short post telling your network about how X recruiter really went above and beyond to make you feel welcome, or about how be accommodating and professional they were, or whatever. Make sure to use the mention feature so they’ll get a notification and see it.
Flattery will get you everywhere… and public flattery that might make its way back to their manager, doubly so.
Obligatory plug for one of FreePrintable.net’s sites: ThankYouLetter.ws. They have a whole section with interview thank you letter templates, and a page with specific tips for interview thank you letters. (There are also tons of other letter templates if you browse around a bit.)
As a former professional recruiter and recruiting manager, I confirm, especially for entry-level positions, where you are competing with oodles of people. This little thing can make a difference. Also the fact that, maybe, you took time to google the “interview etiquette”.
-You don’t get better at drawing by avoiding drawing until you are better at drawing.
– You don’t have to make a new masterpiece every day it’s okay if all you drew is a doodle of a bug. You are now +1 bug doodle better at doodling bugs.
– Also it’s okay if the thing you drew didn’t turn out very good. Everything you draw makes you one step closer to being able to draw good. You are still +1 step better at drawing whatever you drew no take backsies.
– You are the only person who knows if your art didn’t turn out as good as you wanted it to. You are the only person who can see the things in your art that weren’t what you imagined in your head. No one else will know unless you tell them.
– Comparing yourself to other artists just isn’t fair. You get to see all of your art, the best stuff and the worst stuff. You usually only get to see the best stuff other artists make. You don’t get to see that half drawn badly propotioned face they drew at 2 am and immediately scrapped. So don’t compare your badly drawn 2 am face to their best work.
– Just keep making art. The only way you can really fail is if you give up.
I’ve been using Clip Studio Paint (aka Manga Studio 5) for the last 2 years and I really cannot recommend it enough. It has the smoothness and blending of SAI, a really good brush system and some of Photoshop’s capabilities without the heaviness of the software. I mean, what more could you want?
Unfortunately I feel like the UI deters some people from using it (including my friends…). I can see why and I have to admit the default layout looks a little overwhelming in the beginning. On the bright side, CSP is incredibly flexible with its settings and there are many ways to adapt it to suit what you’re accustomed to. In my case, I wanted something more similar to SAI to make the software transition smoother (old habits die hard I guess).
* There’s a note at the end of this post with a download link to my layout and hotkey settings, plus instructions on how to enable it.
I hope this helps people who feel somewhat lost when they open the program for the first time ><
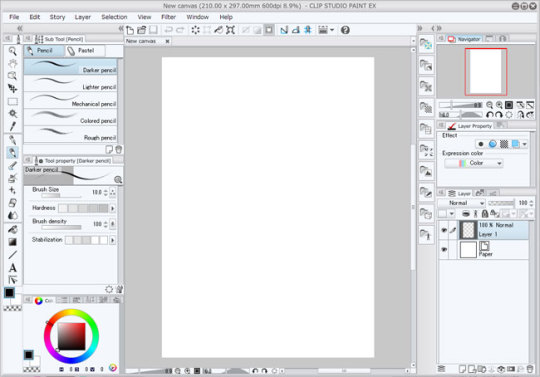
First things first: Close everything you don’t want and drag panels around. Re-arrange everything however you want, even down to tool order. Actually, most of this post may come off as common sense, but I think it still helps to have a rough idea of what exactly you can do with CSP if you find yourself just not getting into it at all.
This is the default:
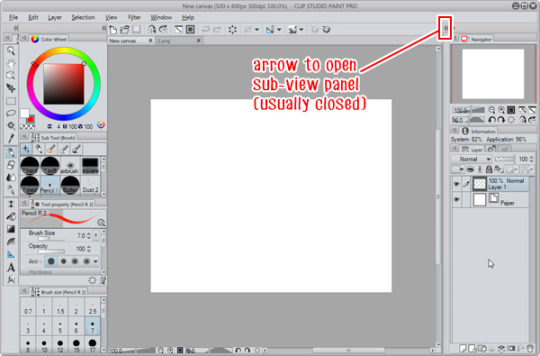
My current layout:
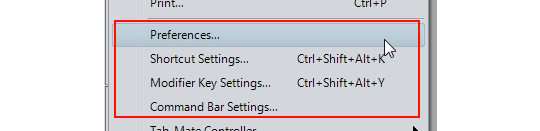
After that, there are four areas of settings you need to check on, under File:
Preferences
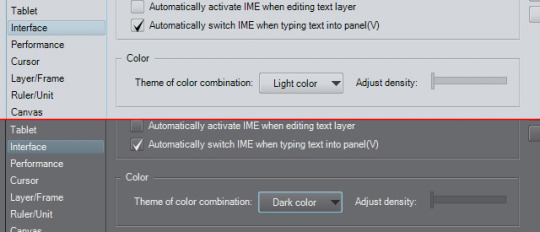
From the Preferences you can edit a lot of options regarding to how the software functions. From a UI and general ease-of-use standpoint, these are the key points you might want to look at: ►Interfacetab: You can change the UI to have a light or dark colour using a slider, from a really light gray to really dark gray (almost black, similar to Photoshop CS6 default)
► Cursor tab: You can change what the cursor looks like when selecting certain tools. ► Layer/Frame tab: You can change the naming convention for when you duplicate a layer, and you can also set layer folders to [Through] layer mode as a default, instead of [Normal] layer mode. ► Ruler/Unit tab: For changing the guide lines for when you set rulers, also setting the default units you want to use (px or mm) ► Canvastab: Under ‘Scale’ and ‘Angle’ you can set the zoom and rotate levels the zoom and rotate buttons snap to.
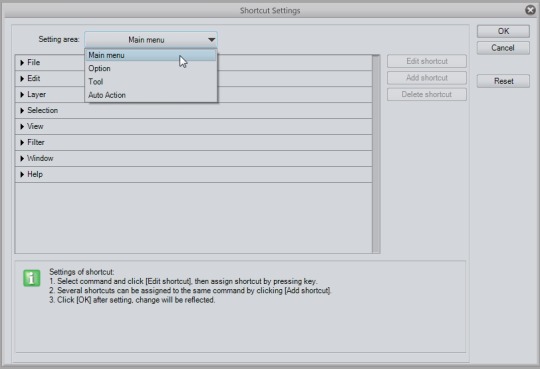
Shortcut Settings
This is pretty self-explanatory and if you’ve modified Photoshop hotkeys, the window might look familiar. If you use hotkeys heavily like me, I recommend you look through it thorougly since some hotkeys might be different from what you’re used to or don’t have a hotkey set to it at all. You can set hotkeys to anything on the main menu, various general options (like increasing/decreasing brush size and main>sub colour switching), specific tools (even custom brushes) and auto actions. Settings I recommend checking, mostly because these are what I personally care about:
Main Menu: Edit > Clear Edit > Fill Edit > Convert brightness to opacity (converts degrees of white to degrees of transparency, useful for things like lineart) Edit > Transform Layer > Duplicate layer Layer > Merge with layer below / Combine selected layer (these two are different, and unlike in PS where Ctrl+E works for both, it is separate for CSP) Layer > Combine copies of displayed layer (Merges all visible layers into a separate layer, aka PS’s monster shortcut of Ctrl+Alt+Shift+E) Selection > Select All Selection > Deselect Selection > Invert selected area View > Rotate > Flip Horizontal (mirroring)
Option: Drawing color > Switch main color and sub color Drawing color > Switch to transparent color … Or any of the different combinations they have, depending on what you want. Unlike PS and SAI, CSP has a third colour option available, which is ‘transparent’, so you can ‘paint’ using transparency, which functions pretty much like the eraser without needing to change tools.
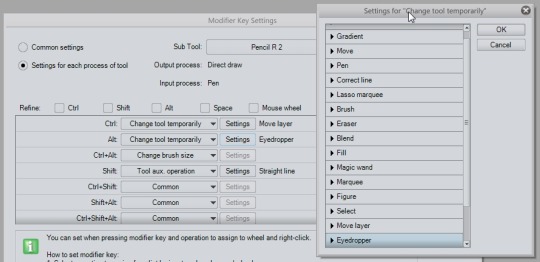
Modifier Key Settings
This is a pretty important part to stop by because it affects how you use your tools. Basically, for each tool, you can set what happens when you hold Ctrl, Shift, Alt, Spacebar or use the mouse wheel. With Photoshop and SAI, you may be used to normally having the colour picker / eyedropper when you hold Alt, and moving the layer’s contents when you hold Ctrl. Some of CSP’s default values of these shortcut keys are different, and I recommend getting a feel for the tools you use and changing these settings as you go.
To change a brush to eyedropper while holding Alt: ► Select ‘Settings for each process of tool’, and under ‘Sub Tool’ select which specific tool you want. ► Under the ‘Alt’ dropdown, select ‘Change tool temporarily’, then click the Settings button. Select ‘Eyedropper’ and click OK. (You don’t have to go all the way down the list of settings, unless you want to refine it to a more specific function)
To change to move layer while holding Ctrl: ► Do the same except under ‘Ctrl’, select ’ Change tool temporarily’ to ‘Move layer’.
Other settings from the drop down: ► For Shift, you can go to ‘Tool aux. operation’ on the dropdown, and check the ‘Straight line’ box to make straight lines that connect clicks when you hold Shift.
There are more so please look at the list carefully if you find yourself needing something regarding those key holds.
Command Bar Settings
The command bar is the strip at the top with all the icons, just above the canvas tab. Basically you can put a bunch of shortcuts there of anything in the main menu. It’s really up to you. For mine, I keep the View > Rotate > Flip Horizontal icon on there so I can tell if my canvas is mirrored (because sometimes I forget the canvas is flipped and only realise when I’ve saved and looked at the pic). I also put the icons of all the correction layers I use the most, and the Layer > Combine selected layers icon since my Ctrl+E is already taken up by Merge with layer below.
Additional general notes on navigating and setting up CSP:
► I recommend checking out everything under the Window menu, you might find a really handy panel that isn’t normally open, or you can even disable the Command Bar if you want. I like to keep the Information tab somewhere on the side so I can see if I’ll start lagging any time soon because of big files (lol).
► The Sub View panel is also really useful that it works as a box to place reference images in. You can open an entire folder there and scroll through using the arrows. You can set it so that every time you hover over the panel, the eyedropper is automatically on (handy!)
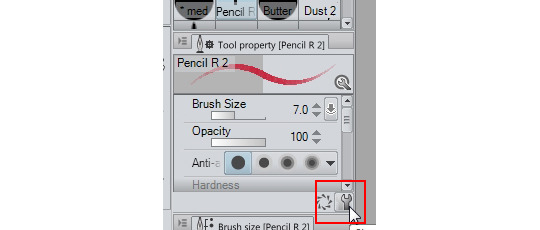
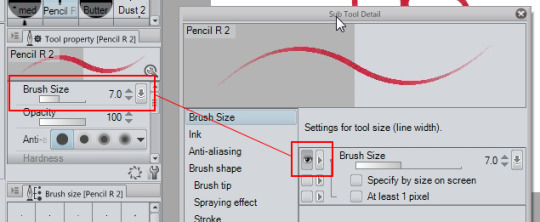
► Brush settings are accessible through this little wrench here at the bottom right corner of the tool property panel.
► Speaking of brushes, you can select which options are visible in the tool property panel by enabling the eye button.
► Each panel has this menu button. You’ll find even more display options there such as enabling/disabling panel-specific icon bars, changing the size of brush tiles, etc.
____________________________
TL;DR: Anyways, if you are too lazy to do this all yourself, you can just download my workspace file and open it yourself. Everything I’ve written about here (shortcuts, modifier keys, etc.) I’ve set to suit habits I’ve formed from using PS and SAI over the years. If you are in the same situation then I hope this will come in handy as a base for your own settings!
Personal hotkey list that’s included in the file (that I can remember): A = Brightness to opacity D = Clear layer F = Fill Ctrl+J = Duplicate Layer Ctrl+K = Flip layer/selection horizontally (as in the Transform command, and not mirror) Ctrl+U = Hue/Saturation Ctrl+L = Levels Ctrl+Shift+I = Invert selection Ctrl+I = Invert colours Ctrl+E = Merge to layer below Ctrl+Alt+Shift+E = Merge all visible layers to a separate layer Ctrl+T = Transform Z = Main > Sub colour switch Shift+Z = Switch to transparent colour X = Mirror canvas 1,2,3,4,5,6,7,8,9,0 = Change brush opacity in 10% increments End = Resets Rotate and Mirror
Things like Ctrl+Z / X / C / V / A / D / W / O / S etc. remain the same as normal in other programs. Ctrl+Y is Redo.
Instructions: Put the file in your Documents CELSYS_EN CLIPStudioPaintVer1_1_0 Workspace Folder. Then open CSP and go to Window > Workspace and select “SAI…ish”. Click OK to importing the settings. Hopefully that should work! (If nothing changes, you can try Workspace > Reset “SAI…ish” and click Yes)
* Make sure the file is named workspace_2.spws * If that clashes with another workspace in your files, you can just change the 2 to any number
Paintovers are very common in many fields, not just publishing. So do not take it personally, like there is something wrong with you. There are many many reasons why an AD will do a paintover rather than just tell you in words:
—The AD is over there selling your work to their approvers (editors/publisher/author) and those people do not have the capability to visually imagine like artists do, so to get buy-in from them on the direction the art is going to go, the AD needs to show them. Once that is approved you really need the illustrator to not change it too much, or you have to start over with approvals. In many cases an illustration has been saved from being killed by an AD’s photoshopping, so it might help you to realize a paint over is preferable to a kill. Remember, art isn’t only killed bc it’s not good…a kill might happen if a piece of art is gorgeous but just isn’t serving the commercial purpose the approvers need. But an AD is generally going to be too polite to say “well this almost got killed but I saved it like Indiana Jones and the Temple of Photoshop, high five, go team!” – they’re just going to send you revision notes/paints and assume you know you’re both on the same team.
—Most illustrators are crap at following directions. ADs have had it proven time and time again that if you give illustrators a written list (numbered, bulleted, made as easy as possible to use as a checklist) they still miss things. It’s pretty accepted that if you send 5 points of feedback, and illustrator is going to send it back with only 3 done. Maybe you are more careful. But understand that most of your peers are not, and ADs have to manage that.
—Some ADs are better at explaining themselves visually than verbally. Remember, we’re artists too. We’re not always as clear with the words as we are with the images, especially when it’s something complicated or a note we think can be easily misunderstood. Easier to see it.
—Many illustrators have language barriers and it’s easier to show them visually. We don’t always know which ones do and don’t have problems with english, but sometimes we get that feeling from your emails and we make sure to be extra clear.
THAT SAID…I have never sent a paintover without saying “this is a guide, done roughly, so please recreate with your style/ability” — I know no artist wants to get a paintover, so I try to make them as rough as possible to make it obvious I want you to REDO it. If it’s unclear in this case whether it’s a guide or it’s exactly what they want to keep then I would ask this AD if it’s ok if you rebuild what they painted. Chances are, they’ll say yes but want you to keep very close to what they did, for approval reasons. But they very well might welcome a bit more creativity in how they solved the problem (I usually do, and I will tell the artist how close they need to stick to the paintover).
If you want to be let in on the AD’s thought process, just ask. You can say “I’ve noticed you work by paintovers. Is that a necessary part of your approval process or is it because you are concerned I won’t be able to get all the revisions in text? I’d love to try to save you the effort and take a crack at the revisions without needing the paintovers.” And I would hope the AD answers with some explanation of why they’re working that way. Maybe they’ll be relieved not to have to do a paintover if they can avoid it. Maybe it’ll be the start of a beautiful working relationship. Maybe there’s a solid reason they’re doing it and you’ll understand and not be hurt by it and it’ll still be the start of a working relationship. It never hurts to ask (in a non-hostile way).
Remember, this is a collaboration. An artist and an AD are working together to hurdle all the approvers and make a great portfolio piece that also sells lots of whatever you’re selling. Both sides want that process to go as quickly and easily as possible. ADs aren’t fucking with your work just for fun. They very well could be saving your art from a kill fee.